Those of you who watch the forums, or facebook, know that we just finished a new build. So lets get to it, and give you all the low down and dirty details of this latest project…
This bike is one of those long term projects that seemed to stretch on forever and ever… Before Hugh’s HandBuilt was even started, I started building this bike with a friend of mine. He had purchased several frames/engines/forks/wheels and such as a basket case – and wanted to try and build a bike out of the mess.
Now if you are a motorhead like I am, you can see a pile scrap metal like this, and envision a bike – right?
Well, we did too! Luckily, the score had some good stuff in it. A titled frame, a few engines, and lots of other goodies this thing would need. And, a brand new Wiseco 750 set of pistons that hadn’t even been installed! Sweet!
So we did a quick mock-up to see where we wanted everything to be on the final build… Since the plan was for this to be my friend Cain’s bike -we fitted him to it… High Bar Lane Splitter – yeah man…
This basket case he had purchased was originally intended to be a Cafe’ build – and the previous owner had done a number on the frame. Some places were ground so thin that the tubing would flex poking at it with a screwdriver – total bummer… So with a good title in hand, and a crappy frame – we did the proper thing. We cut that sucker into a million pieces!
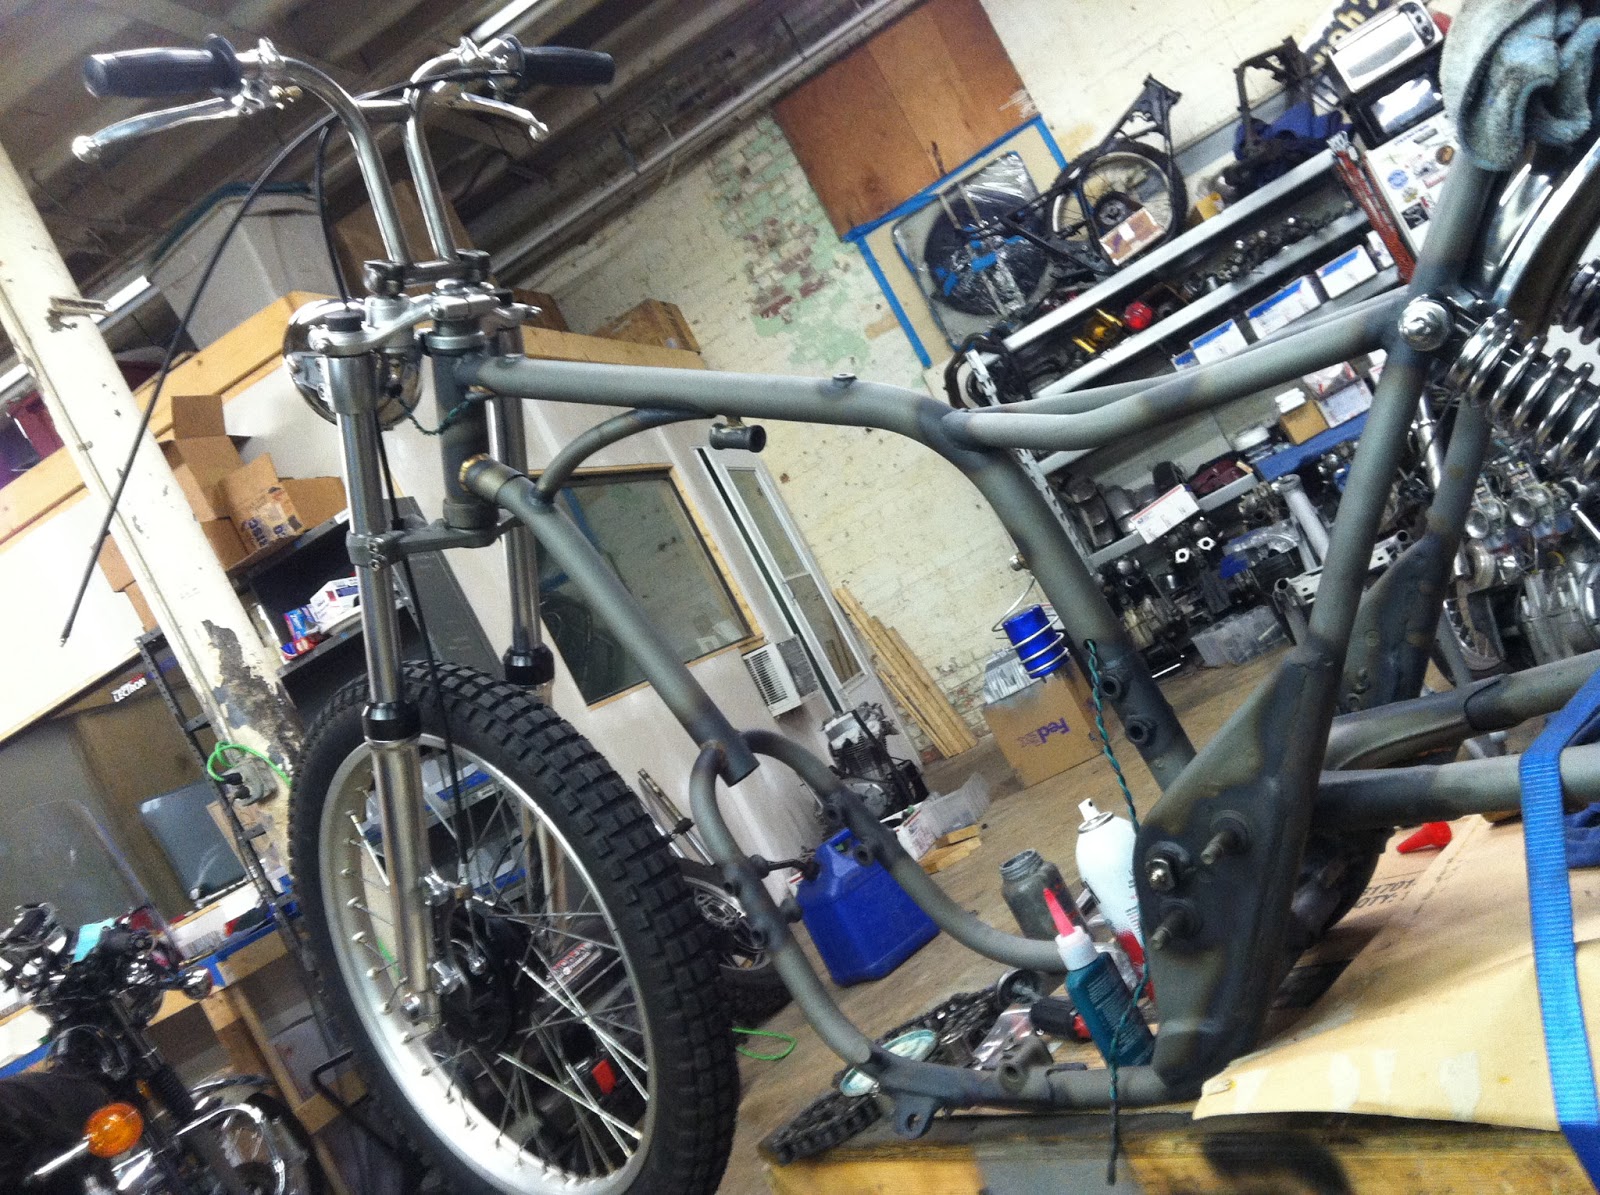
I talked him into doing a subtle gooseneck, single downtube frame and reworking the entire seating area and shock mounts. So out came the sawzall and cutting wheels and into the frame jig we went! Speaking of frame jig – I didn’t even have one until Cain offered to purchase the materials to build it if I’d mod this frame… So the very early and humble beginnings of a shop were coming to be – and I had no clue it was even happening… I spent many many hours in the machine shop at the University making the frame jig in order to build this frame.
Once the frame was built – we needed to build an engine for it. In the timeframe we had, we opted to just install the 750cc top end on the bottom end we already had. New seals, gaskets and a Pamcopete ignition would round it off pretty good. Top it with some Mikuni VM carbs and it should have been good to go.
I decided to bend up some funky lane splitter bars out of some 7/8″ stainless we had laying around the shop. Mounted to the stock risers and lowered the forks about 3″. (If you look in the background, you’ll see a trimmer less bearded Hugh circa summer 2009 – time has not been good to this ugly feller!)
Keep in mind, I was still in college at Appalachian State University back then, studying Product Design and tinkerin’ on motersickles our of my apartment’s basement… Man, them were the days! We’d open the shop door, get some wood and make a fire in the parking lot, and generally have a blast at that place… Times have changed for sure…
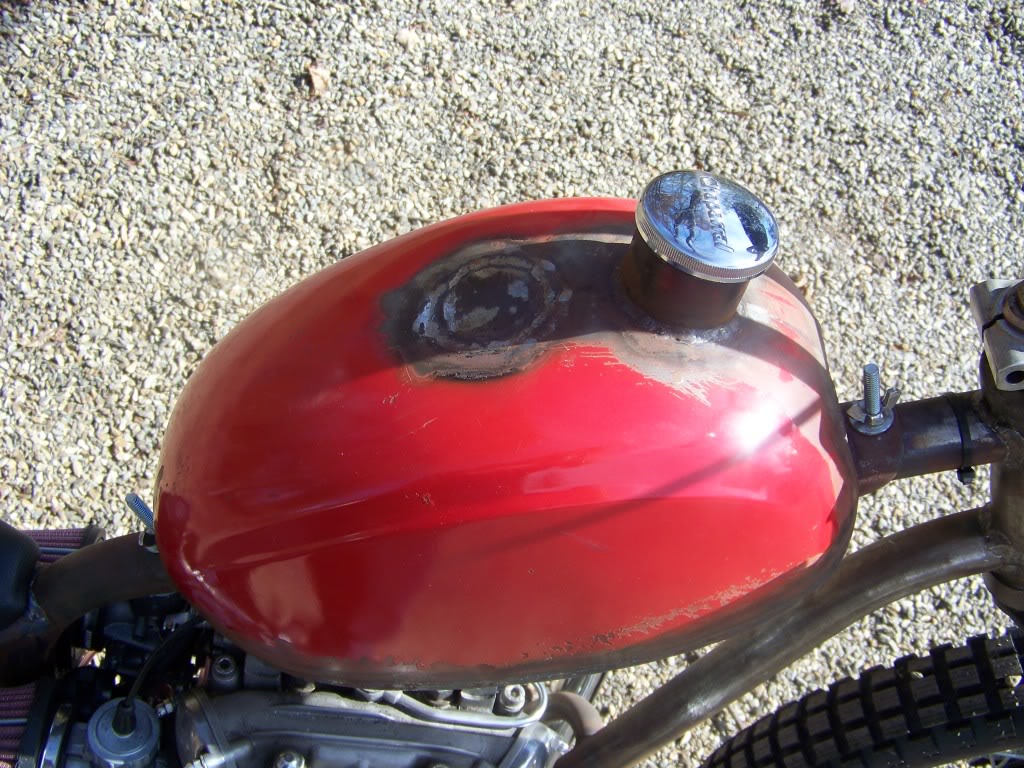
The tank was a funky old NOS dirtbike tank that he had found on the Ebay if i recall correctly. I convinced him we needed to high mount this sucker! I cut the tunnel out of it, flat bottomed it, and then split an old Ford Driveshaft longways for the new tunnel and welded it all together. I removed the OEM filler location, used another chunk of random tubing and relocated the filler cap frisco style. This as the first tank I ever got to modify more than changing a bung or a tab… I had alot of fun reworking this old tank…
We mixed up some resin and made a sweet fiberglass seatpan that fit the frame like a glove. Cain had a buddy of his cover it, and it turned out killer…
Lastly, we added an aluminum rear fender… It was narrow and funky..
Then the bike kinda languished in this state for what seems like years (it probably was really!)… The idea was that we’d build this thing together, hang out, have fun – you know the drill… Well, I graduated college, moved 2 hours away, got a day job (which sucks, I don’t recommend it!) and it really made getting together to build this thing kinda tough. It sat in the back of my shop gathering dust, and generally looking pretty sad… Cain and I would get together when we had time, and we’d make a small bracket, tab, etc… But if you have built a bike, you know those little details can really eat up some time in a build… And time was something the two of us just didn’t seem to have at the same time… Total bummer…
In the meantime, I had quit my dayjob (you should too, building bikes is much more fun!) and started Hugh’s HandBuilt with the last paycheck from my old job… Long story short, we got busy FAST! I would have never seen it coming…
That didn’t help this build along at all… So after the years passed along, the bike garnered more and more dust and it was starting to look like this thing would never come to life. The economy was tanking, both the owner and myself really couldn’t afford to finish it. Cain debated selling it off, but I didn’t want it to slip away after all these years, so a deal was struck and about 2.5 months ago – I became the owner of yet another XS – go figure!
So I instantly dusted her off, and put her up on the lift. I installed one our HHB PMA Systems, Red-Koted the tank, swapped out the headlight and fender for something more my style and started tidying it up to get it fired for the first time ever… Running the PMA would also mean I could run the bike without a battery… And no battery makes for a super clean, kick-only ride… Just my style…
I made sure to bleed a little bit while working on it.. These old bikes simply won’t run proper if you don’t bleed on em… No seriously…
With a Mac 2-1 on it, and a little bit of blood in the oil – she fired right up on the first kick! No brakes, no lights, but hey – at least it was up and running.
So I swapped out the disk rear wheel for a 1 year only Drum Mag wheel, fabbed up some brake linkage and headed out for the road for a bit of testing… I did find that the cheapo replacement brake arm hardware was not up to the task of holding the brake drum in place – BOOOM!!!
The swingarm/brake arm hardware had sheared while I was on I-40 after I gave the rear brake a good stompin’ – and of course I didn’t have the front brake hooked up… The linkage tore loose, hitting me in the hip and doing a bit of damage to the narrowed fender I had mocked up…
Shake down runs tend to really shake you up sometimes… I rode it the 3-4 miles back to the shop with no breaks. Compression braking to the rescue!
Pulled the rear fender, found some OEM hardware and built new linkage for the brake arms and I was back in business. I did quite a bit of riding locally as you see it below. The handling on this bike was spot-on, and that big 23″ front wheel just begged to go off-roading and jumping the stairs. I can’t say that none of that happened… So yeah, I fully abused her in the “testing and tuning” stage of the build.
I’m pretty hard on my bikes – I can’t lie… I figure if they’ll handle the abuse I give them, then it should be good to go. In the meantime, there is a makeshift skate park behind my shop, and I started jumping the box jump a few too many times, and broke the frame. I thought it was getting a bit squirrely on the landings – haha…
The shock mounts needed some serious beefing up, so I cut off the tail section and refabbed it using a bit stronger tubing and more solid shock mounts. I added a short section of a KZ fender and we were back in business…
So I got it all back together, and for the life of me could not get the Mikuni VM34’s to work well with the Mac 2-1 Pipe. I tried baffles, rejetting, swapping different 2-1 pipes and nothing was fixing the terrible flat spot I had in the middle of the rpm range… I eventually tossed on some Yo Mama pipes from Pandemonium and the bike instantly ran better… I was kinda bummed, because I really liked the look of the 2-1 pipe…
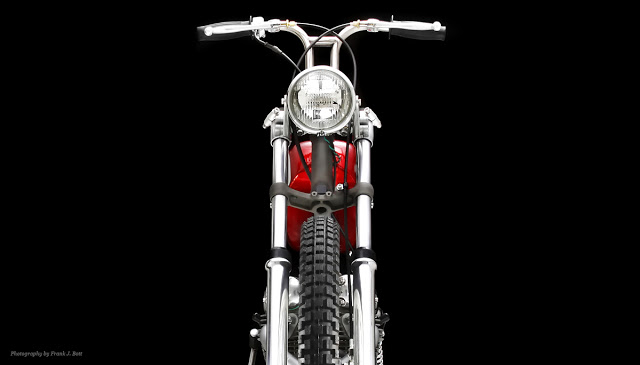
You’ll notice that the front end is higher as well. The way I was riding this thing, it just begged for more fork travel, so I found another set of OEM 35mm Forks and installed them. Oh yeah, I fabbed up some bracketry to make the 23″ drum front brake actually work – good thinking….
Once I had the flat spot out of the tune thanks to the 2-2 pipes, I could really ride this thing! I rode it about 50 miles until I realized what had to be done… That vibrating 360 big bore engine was just not gonna cut it… I like to ride, and ride hard… And the vibes from the stock firing pattern in the big bore engine were enough to rattle your teeth out at highway speeds. I tried everything, different gearing, filling the bars with silicone, but there was just no way around it… As much as it pained me, I pulled a freshly built good running big bore engine
out of the chassis and tore it back down to the bare cases…
A 277 Rephase was
in order…
I got the engine back together, fired it up on the run stand – when a new engine build fires up on the first kick, you know it’s gonna be a good build!
So with the chassis sorted out, and a
freshly built 277 engine – It was time to finally finish the bike properly…. I added a few finishing touches to the neck of the frame, a new couple of gussets and an internal wiring tube for the headlight wiring…
After fabbing up new coil mounts (the rephase requires 2 coils) and all the little tabs/brackets/switch mounts, etc – it was time for the final finish. I spent about 8 hours grinding and blending all of the OEM ugly off of this frame… Tabs, brackets, holes, etc.. all had to be cleaned up. I always love when someone is like “Dude, that bike is soo clean and simple” – as if unicorns just flew into the shop and made it happen. Simple and clean takes time…
I had always wanted to have a “raw” bike, but I really can’t get into the rusty half-assed look. No offense to those folks that do, but it’s just not my nature to neglect something I’ve worked so hard on… But, to keep the raw look, I had the entire frame sandblasted for a nice even finish on the frame. Then I painstakingly reblued all of the welds on the frame for 12 hours or so… Being extremely careful not to touch the frame (freshly sandblasted steel will flash rust in a hurry, especially with oils from your hands) and using gloves during the whole process.
I had seen some really cool BMX bikes done like this years ago, and since this thing rides like a BMX and spends some time in the air, it seemed like the perfect fit…
Into the powdercoating oven for a coat of clear… My direct neighbor at the shop is a powdercoater, so I had an inside bit of help for this process… It was pretty cool though, because he even let me spray the powder myself. I like having as much hands-on experience as I can in a build… From the time I had the frame blasted, it was less than 20 hours to get into the oven.. Any longer and I would have risked having flash rust form on the chassis…
Final assembly was long and slow… Just like all of my builds… I make sure each bolt is clean, all the threads are chased, each little thing takes time…
We shaved and polished the front forks – they ended up looking sweet! We do alot of forks for customers, but it’s rare we get to see them go on the bike. Seeing them come together makes it all the better.. New seals and oil, new tapered steering bearings, new wheel bearings, new tires, new brakes, new bronze swingarm bushings, new cables, new chain, new wiring – I replace it all… A good new build should be just that – new…
Clean clean clean… That’s the name of the game for a new build… I might be a bit too picky…
Speaking of being picky – I have only a few folks I use for paint…
John Dills of Dills Paintworks is the man with a plan, and for this bike – we made a killer plan for the paint…
John and I had been scratching our heads on how to paint the tank on this thing for a few months… But after riding, jumping, pulling wheelies and being a total terror on this bike, we had our inspiration…
Enter Pure Hell – “One of the most fearsome, and feared AA/Fuel Altereds of the 1960′s”
Hell yeah, that’ll do it! I know this bike will never be the terror and fame that Pure Hell is – so we’ll just call it “Slight Hell” – how bout that….
So with an inspiration for the paint, John and I both decided the flames needed to go backwards… I mean, the whole bike is funky as it gets – so why the hell not. That’s what I like about John, he’s an amazingly talented award winning painter, and he’s cool enough to do some funky stuff for us from time to time… Spend money with John, he’s HHB Approved – and that’s saying alot!
Love it or hate it? Don’t care… Because it straight up rules!
Topped off the bike with the only bit of actual paint it has…
A little bit of color was needed in the lower part of the chassis, so I spun up some brass pegs and got em fitted up…
It’s not always bike building in the shop. I have a 5 month old little girl, and she comes to the shop everyday for Daddy Daycare… Can you image what kind of little terror she’s gonna be – being raising in a motorcycle shop like this??? The boy’s won’t know what to think… And they better not be thinking anything if they know whats good for em’
I am always very proud of my works, but I am an even more Proud Daddy… Having her in the shop everyday really puts things into perspective… It’s why we work as hard as we do, so she can have a great future – and maybe she’ll be the next greatest thing on 2 wheels on day? Who knows, all I know is that she is the greatest thing I have ever been a part of…
We had a few long days and late nights finishing this bike up…
We installed a modified set of our soon to be released Speedster pipes onto the bike, wired it up, installed the tail light (almost forgot that little detail) and it was ready to rock! But not before we had it photographed over at
Frank Bott’s studio..
Frank is a real cool cat, he’s done some amazing photography of some really sweet bikes. Being that his studio is less than a mile away from my shop – it was a no brainer. So before we even put fuel in the new build, we took it over to Frank and had a great time in the studio getting some great shots of the bike..
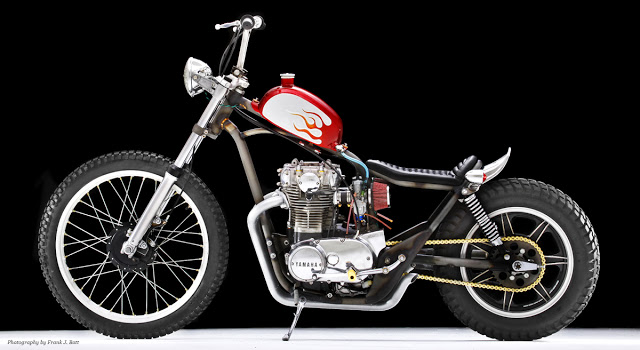
Here are a few shots from the shoot… Dude can really capture the spirit of a build…
I think we nailed the lane-splitter feel we wanted, she’s skinny….
Pretty awesome huh? I’m not talking about the bike, but Frank’s Photography… We spent 4 hours in the studio taking pics of this bike… He had a great time shooting it, and we had an even better time sharing stories and getting to know one of our neighbors a bit better…
Ok, so it looks pretty sweet… I mean, it’s been almost 4 years in the making…. Jeeeeze, I hope I never have another build last that long. The original owner and I differed on a few ideas (which is totally normal when two creative minds collaborate on something) but once it was in my hands, I think I was able to add all the perfect Hughstyle touches to the bike to help make it completely mine.
But did it pay a good tribute to “Pure Hell” – well, it’s still cold here in North Carolina, but we had another shoot the other day to get some action shots… I think she’s doing all she can to live up to it…
So until I get more pics from the other photoshoot, this’ll have to do it for now…
I can see the emails now “Hey Hugh, what did you do to xxxxxxxxx and xxxxxxx on that bike….”
So here’s the specs:
1975 XS650
277 Degree Rephased Engine By HHB
Ported Head
Web 59 Camshaft
Pamcopete 277 Ignition
Wiseco 750cc Pistons
5th Gear Overdrive
Shell Racing type Intakes
Modified HHB Speedster Pipes
16″ 1981 XS650 Rear Wheel
Duro Rear Tire
23″ Honda Front Wheel
Chen Shin Front Tire
Shaved and Polished XS650 35mm Forks
Custom HHB Stainless Lane Splitter Bars
HHB Solid Riser Bushings
Custom HHB framework – 2″ up, 1.5″ out, 1.5″ Swingarm Stretch
HHB PMA Charging System
Custom Seat Pan – HHB
Seat Cover – Unknown
Headlight – Side Mount Bates Style
Tail Light – Cheapo HD style LED
Batteryless Setup with a Sparx Capacitor
Mikuni VM34 Carbs
Tapered Steering Bearings
Bronze Swingarm Bushings
KZ Rear Fender
HHB Brass Foot Pegs
Kick Only
And for those wondering about running with no battery? Well here ya go…